How to Connect Grafana to a Remote MySQL Database
Grafana needs data to be useful. Jack Wallen walks you through the process of using a MySQL database as a source for data visualization in Grafana.
Grafana is one of the most widely-used interactive data visualization tools on the market. It’s open-source, powerful, highly configurable and free to use. I’ve walked you through the process of installing Grafana on Ubuntu Server 20.04, and this time around, I’ll help you connect that newly installed platform to a MySQL database, so you can visualize that data.
Grafana allows you to connect to numerous data sources, such as Google Sheets, Amazon Timestream, Elasticsearch and many databases. Because MySQL is such a popular database, I thought it would be a great data source to use as an illustration. This will also refresh your memory on how to set MySQL up for remote connections.
Jump to:
What you’ll need
To make this work, you’re going to need a running instance of Grafana, a running instance of MySQL and a user with sudo privileges.
For this tutorial, I am going to assume your instance of MySQL is on a remote Linux server.
How to configure MySQL for remote connection
The first thing we must do is configure the MySQL server to allow remote connections. On top of that, we’re going to create a specific user that has specific permissions for the database we’ll view on Grafana.
SEE: Explore these open-source and Linux terms you should know.
Configure MySQL for remote access
Going through the process below will help ensure MySQL is indeed configured correctly. In fact, if the MySQL server is not running on the same server as Grafana, it is critical that you follow the steps below first, as a stock MySQL installation usually is not configured to allow for remote connections.
- First, log into your MySQL server and open the MySQL configuration file with:
sudo nano /etc/mysql/mysql.conf.d/mysqld.cnf
- In that file, look for the line:
bind-address = 127.0.0.1
- Change that to:
bind-address = 0.0.0.0
- Save and close the file, then restart the MySQL service with:
sudo systemctl restart mysql
Create a new user with specific permissions
Now that we’ve set up our MySQL server to allow remote connections, we need to create a new user and give it the correct permissions. To do this:
- Log in to the MySQL console with:
sudo mysql -u root -p
- Make sure you know which database you’re going to be using. You can list them out with:
show databases;
- Create the new user with:
CREATE USER 'grafanareader' IDENTIFIED BY 'PWORD';
Where PWORD is a strong/unique password for the new user.
- Now, we can grant that new user the SELECT permission for the database with:
GRANT SELECT ON DB.* TO 'grafanareader';
Where DB is the name of the database to be read by Grafana.
- Flush the privileges and exit from the MySQL console with:
flush privileges;
exit
Your database server is now ready.
How to connect Grafana to MySQL
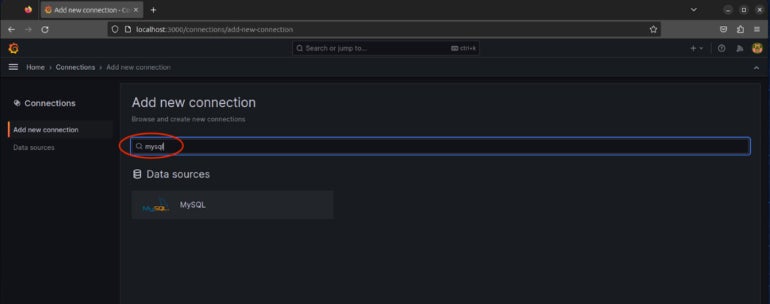
Log into your Grafana instance, and click the hamburger (3 horizontal lines) icon in the left sidebar. From the resulting pop-up, click Add new connection (Figure A).
Figure A
In the next window, type mysql in the search bar, and hit Enter, or scroll down, and click MySQL from the listing (Figure B).
Figure B
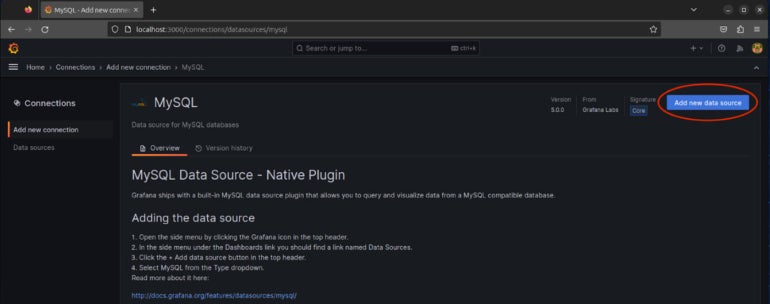
On the next page, click on the blue Add new data source button in the upper right (Figure C).
Figure C
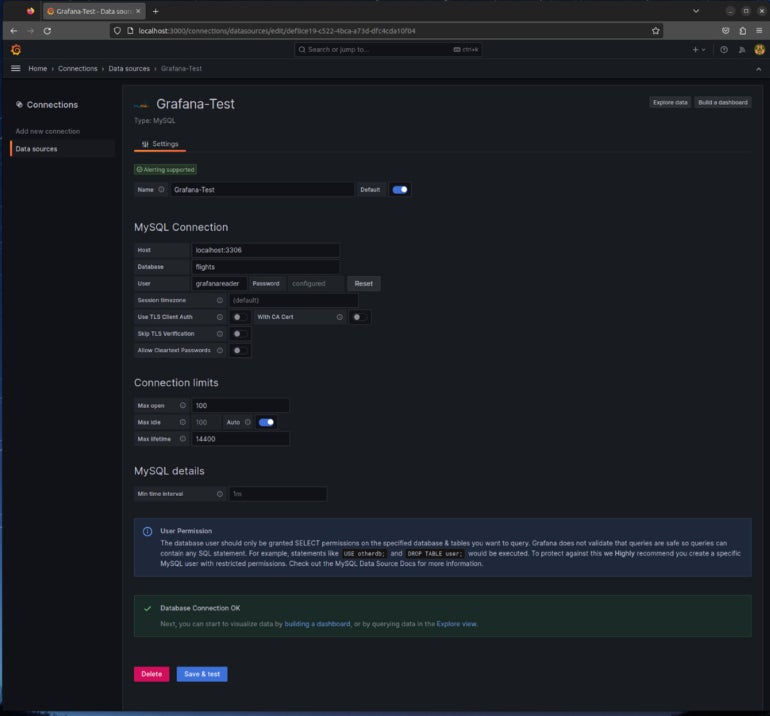
You will then be presented with the necessary configuration options for a MySQL data connection. Here’s what you must fill out:
- Host: The IP address or domain name of the MySQL hosting server, along with the port used for the database server. Note that if you are setting up a connection to localhost:3306, which is the default value specified, you must click into the field and type it in, or else the connection will not work.
- Database: The database to be used as a source.
- User: grafanareader.
- Password: PWORD used to create grafanareader in the MySQL console.
You might also have to enable Skip TLS Verify. And you may want to consider specifying a name for this connection, especially if you need to have multiple MySQL connections from Grafana.
Configure those options, and click Save & Test. You should eventually see Database Connection OK (Figure D).
Figure D
Congratulations! You now have Grafana connected to a remote MySQL server. In our next piece in the series, we’ll create a new dashboard to view some of the data from the source.
Now that you have successfully connected to your MySQL data source, it’s time to take the next step by adding a dashboard.
SEE: Not satisfied with Grafana? Consider these cost-effective data visualization tools.
Source: News
India signs historic international agreement at AI Safety Summit in the UK